This guide is now outdated. If you are looking for an up-to-date version for CentOS 8 please take a look at:
https://bash-prompt.net/guides/magento-centos-8-10m/
The Magento developers provide documentation covering installing Magento, however, they have created too much documentation. They list many options at each step which are spread across many pages of dense information. I have gone through this information and extracted a simple walk through that will get you from a fresh CentOS 7 server to a working Magento installation in under 10 minutes.
All that you will need to follow this guide are:
- A CentOS 7 server with at least 1GB of RAM.
- A basic knowledge of using the Linux command line.
In order to begin these steps, you must SSH into your server as the root user.
Step 1 – Installing all necessary packages.
Magento requires a web server, a database server, PHP and some PHP extensions in order to run.
We will use Apache2 and MySQL as our web and database servers along with PHP7. PHP 7 is not available on from the default repositories on CentOS 7 so a 3rd part repository must first be enabled. The repository that we will use is the IUS Community Repository. They provide a shell script to download and install the necessary packages and PGP keys. The following commands will download their bash script, set it to be executable and run it:
curl 'https://setup.ius.io/' -o ius-installer.sh
chmod 755 ius-installer.sh
./ius-installer.sh
After the IUS repository is installed PHP7 can be installed along with Apache2 and MySQL.
Magento also requires version 5.6 of MySQL or higher which is not available from the CentOS default repositories. The easiest way to get this is to install the www.mysql.com repository linked to from this page.
You need to download the the .rpm for Red Hat Enterprise Linux 7. Once you have the .rpm on your server install it with the following command:
rpm -i mysqlXX-community-release-el7-XXX.noarch.rpm
You will need to change the file in the command to match file you downloaded from www.mysql.com.
Next, the following command will install everything required:
yum update
yum install httpd mysql-community-server php70u php70u-pdo php70u-opcache php70u-xml php70u-mcrypt php70u-gd php70u-devel php70u-mysql php70u-intl php70u-mbstring php70u-json php70u-iconv php70u-mysqlnd php70u-fpm
Step 2 – Create a system user
The Magento developers recommend, for security reasons, that non-root system user is created and given ownership of the Magento installation files.
We will now create a user called magento and add them to the web server’s group with the following commands:
adduser magento
passwd magento
usermod -a -G apache magento
Next, we need to create and configure the database that Magento will use.
Step 3 – Creating a database
In order to create a database, we need to first enter the MariaDB shell. This is simply done by entering the command mysql on the command line. When you do that you will be immediately taken to the MariaDB shell that will supply a new prompt that looks like this:
mysql>
The following command will create a new database called magentodb:
CREATE DATABASE magentodb;
Next, we have to create a new user called magento and assigned them full permissions to the new database with the following command:
GRANT ALL ON magentodb.* TO magento@localhost IDENTIFIED BY 'a_strong_password';
You must change a_strong_password to a secure password when you enter this command. Make a note of the database name, username and password as they will be required later. After you have done this log out of the MariaDB shell by entering exit;
It is a good idea to validate the database we just created along with the username and password. This is done by logging into the MariaDB shell as the new user with the following command:
mysql -u magento -p magentodb
If you are able to log in using the password you set then the new database and user are working correctly.
The next job is to download, unpack and prepare Magento archive.
Step 4 – Downloading the Magento archive and setting permissions
The archive containing Magento is downloaded from this page:
https://magento.com/tech-resources/download
You should select version 2.1.x without sample data. We will use the .tar.gz version as this is the most widely supported compression format. You will need to create an account on the Magento site to download the file. Once you have downloaded the file to your local computer you will need to upload it to your server.
After you have uploaded the archive to your server you need to log back in as root and create the directory that will contain the Magento instance.
In this guide, we will install the Magento instance to /var/www/magneto.
The following command creates this directory:
mkdir /var/www/magento
Next, copy the Magento archive into /var/www/magento:
cp /path/to/Magento-archive.tar.gz /var/www/magento
Then, move into /var/www/magento and unpack the archive:
cd /var/www/magento
tar -zxf Magento-archive.tar.gz
The archive is no longer needed in the installation directory so should be deleted:
rm Magento-archive.tar.gz
Next, we will set recommended ownerships and permissions. The following commands must be run from the installation directory, i.e. /var/www/magento:
cd /var/www/magento
find var vendor pub/static pub/media app/etc -type f -exec chmod g+w {} \;
find var vendor pub/static pub/media app/etc -type d -exec chmod g+ws {} \;
chmod u+x bin/magento
Finally, set the correct ownerships:
chown -R magento:apache /var/www/magento
We will finish installing Magento from an installation page accessed by a browser. Before we can do this we must configure Apache2 to serve the site.
Step – 5 Configuring Apache2
Apache, PHP and all the necessary extensions were installed at the beginning of this guide. All that is left is to create the VirtualHost file for the site that you will use to access Magento.
First, change to the directory that holds the main Apache2 configuration:
cd /etc/httpd/conf
Then edit the main configuration file for Apache2:
nano httpd.conf
You must scroll down to the bottom of this (long) file and paste the following at the bottom of the file:
<VirtualHost *:80>
        ServerName www.example.com
        DocumentRoot /var/www/magento
        ErrorLog /var/log/httpd/magento_error.log
        CustomLog /var/log/httpd/magento_access.log combined

        <Directory /var/www/magento >
                Options FollowSymLinks
                AllowOverride All
        </Directory>

</VirtualHost>
You must change www.example.com to match the domain name of your website.
It is always a good idea to check new Apache2 configuration with its built-in tool to ensure that there are no errors. This is because if you have made a mistake in the configuration Apache will not restart taking any other sites on your server offline. The following command checks all of Apache2’s configuration:
apachectl configtest
If there are no problems Syntax OK will be printed to the screen. If there is an issue the output will tell you the file and line that has the error. When you can pass the configuration test run the following command to reload Apache2:
systemctl reload httpd
We can now browse to the installation page and start the installation.
Step – 6 Installing Magento
We will install Magento by accessing the installation page in a web browser. You only need to visit the web site address that you set in the VirtualHost file and you will be automatically redirected to the installation page.
Start the installation by clicking on:

On the next page click:

This will initiate a test that checks that all the required PHP extensions are on the server and that the correct ownership and permissions were set. Everything should pass as we have installed and configured everything as required by Magento.
Click:

to proceed to the next page when the tests have completed.
The next page is where we configure Magento to use the database we created. This is a screenshot of the fields filled in with the details we used when we created the database above:
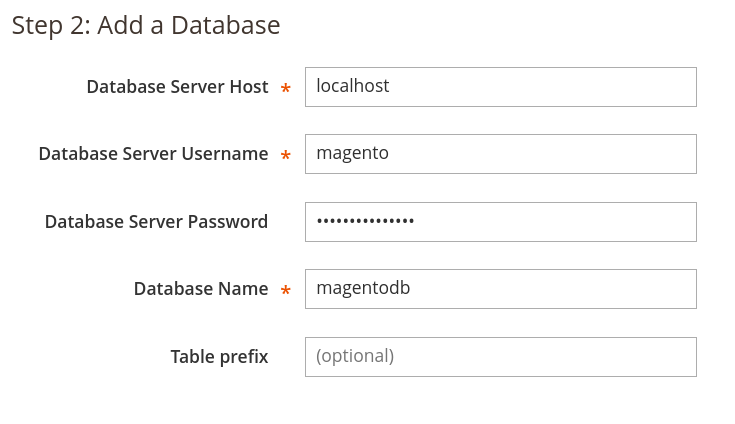
You will need to enter the password you set when we created the database. Click Next when you have filled in the fields.
The next page is where you can change the store name and administration access URL if you need to. If you are not sure about these leave them as you can change them after Magento is installed.
On the next page, you can set the time zone, currency and language of your store.
The next page is where you must create a user to access the Magento administration panel. Do not use admin as the username as this is always the first username that hackers will try to guess.
Click Next when you have filled in those fields and taken a note of the information you set.
On the last page click:

This will initiate the installation process. It will take a couple of minutes to complete.
When the installation has finished you will see a Success page listing all the details of your Magento installation. You should copy and paste all this information into a file for future reference.
The final task for this installation is to create the Magento cron jobs.
Step 7 – Creating the Magento cron jobs
Magento requires several periodic, backend tasks to keep the installation working correctly. Linux has a specific program called cron which is designed to run tasks or jobs at intervals. We will configure cron to run Magento’s backend tasks.
On the command line run the following command to open the crontab (the crontab is the file containing the jobs for cron to run) in editor mode as the user magento.
crontab -u magento -e
When the editor is open copy and paste the following three lines at the bottom of the file:
* * * * * /usr/bin/php /var/www/magento/bin/magento cron:run | grep -v "Ran jobs by schedule" >> /var/www/magento/var/log/magento.cron.log
* * * * * /usr/bin/php /var/www/magento/update/cron.php >> /var/www/magento/var/log/update.cron.log
* * * * * /usr/bin/php /var/www/magento/bin/magento setup:cron:run >> /var/www/magento/var/log/setup.cron.log
When you have pasted these three lines make sure to leave a final, blank line at the bottom of the file (as shown above) as this is required by cron.
Magento is now installed and working.
Conclusion
We have now completed a Magento 2 installation following the recommendations of the Magento developers. A good idea at this point is to take a backup of your server or VM before you customize your Magento installation. This will give you an excellent starting point to return to if you mess up your installation or if you simply want to experiment with Magento and want a handy starting point before settling on a production version.