Sometimes the simplest seeming jobs end up being more annoying than they should be. Moving a file from your computer to your phone and vice-versa should be a fairly simple task. However, it’s usually a mess of deciding to email it to yourself, put it into Google docs or Dropbox or hunting around for that USB cable (and appropriate adaptors).
The following method solves this problem but at the expense of being ABSOLUTELY INSECURE. It uses no encryption and no passwords. Your data is un-encrypted in transit and at rest. If you’re thinking of transferring anything secret then either don’t do it like this or encrypt it before you transfer it. However, the number of times I need to move a picture or PDF far outnumbers the number of times I want to move super-secret personal information.
What this technique lacks in security it makes up for in ridiculous convenience.
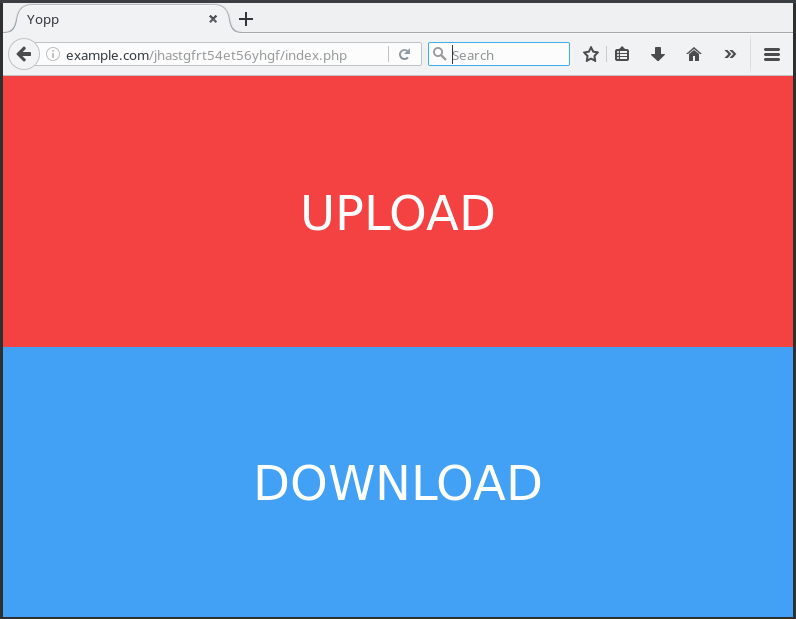
GitHub user josephernest as created a project called Yopp that consists of a single index.php file. This file, when accessed in a browser, creates a page that looks like this:

It works as follows:
- Click UPLOAD on the source device and select a file.
- Click DOWNLOAD on the destination device.
That’s it!
When the file has been downloaded a single time it is deleted from the server. Only a single file will ever be retained for transfer and then only until it is downloaded.
If you look at the URL in the screenshot you can see the nod to “security” is to obfuscate the URL. We will also choose a random port. This will make simple drive-by probes unlikely to find the page but remember, your data is travelling in plain text across the internet.
If you already have a server running Apache or Nginx with PHP enabled then you can serve the file in the usual manner, even via HTTPS and password protect access if you want to.
However, if you just want something quick and dirty then we can serve it using the built-in web server in PHP.
First, you need to install PHP on your server. Whatever is the default version will work just fine.
Next, create a location to serve index.php from. We will use /var/www/yopp for this guide:
mkdir -p /var/www/yopp
The -p will create all the necessary parent directories in case /var/www doesn’t already exist.
Now, create the obscure part of the URL by creating a directory with a long, random name.
If you don’t use it already, the command pwgen, is a much better alternative to mashing the keyboard when generating passwords. It’s available in the default repos of every distro I’ve ever used.
You can run it with just pwgen and it will output a bunch of 8 character passwords. I like to create an alias in my .bashrc file so that I get 20 character passwords by default:
alias pwgen='pwgen 20'
Running pwgen 20 gave me seen6ageePahxahnaMee so we need to create a new directory under /var/www/yopp/ using the random string:
mkdir /var/www/yopp/seen6ageePahxahnaMee
Now, move into the new directory you just created and download the index.php from GitHub:
cd /var/www/yopp/seen6ageePahxahnaMee
wget https://raw.githubusercontent.com/josephernest/Yopp/master/index.php
The default maximum file size is 50MB, if you would like to make this bigger (or smaller) simply edit index.php and modify this line:
$maxsize = 50*1024*1024; // 50 MB
Edit the 50 to be whatever number of MB’s you want new maximum file size to be.
Now, drop back to /var/www/yopp to start the PHP web server. The command to start the PHP web server has the following form:
php -S <interface>:<port> -t document_root
If the public IP of my server is 172.31.45.14 and I want to use port 3748 the command will look like:
php -S 172.31.45.14:3748 -t /var/www/yopp
The problem with this is that it will only run as long as you have this terminal open and connected. In order to detach the command from the terminal correctly and send all of its output to the bit bucket i.e. /dev/null use the following command:
nohup php -S 172.31.45.14:3748 -t /var/www/yopp > /dev/null 2>&1 &
The additional, incredibly useful, Bash commands here are:
-
> /dev/null 2>&1Send standard output to the bit bucket (> /dev/null) and also direct standard error into standard out (2>&1) so it is also deleted. -
nohupThis disconnects the process from the terminal that it was launched in. -
&This creates the process as a job and can be managed using standard Bash job control.
In order to kill this process, you run the jobs command and find the PHP server. This is what running jobs produced on my Ubuntu server:
jobs
[1]+  Running                 nohup php -S 172.31.45.14:3748 -t /var/www/yopp > /dev/null 2>&1 &
The job number is the number in square brackets i.e. [1]. In order to kill job 1 use the kill command along with `%`` and the job number. Here is the command to kill job one:
kill %1
The URL that you need to use to access the upload/download page will depend on the random URL and port that you chose. In the case of the example this URL would access the page:
http://172.31.45.14:3748/seen6ageePahxahnaMee/index.php
Obviously, that is a little difficult to remember so simply bookmark it in any browsers that you need to access it from.
Bonus section!
If you want the PHP server to run for a set time and then die use the bash timeout command. This command will kill any process that follows if after a set period of time. Using timeout 300:
timeout 300 nohup php -S 172.31.45.14:3748 -t /var/www/yopp > /dev/null 2>&1 &
Means the PHP server will terminate after 300 seconds or 5 minutes.