Varnish is a reverse proxy that speeds up web sites by running in front of the web server and serving static websites assets such as images from RAM. Requests for new or dynamic assets such as PHP file are passed on to the web server. Varnish is extremely fast at serving static assets, much faster than a regular web server. The increase in speed is especially noticeable for websites like Magento stores that have a large number of images in each page. This makes a magento store an excellent candidate for running behind a Varnish server.
All that you need to follow guide this is:
- An Ubuntu 16.04 or Debian Jessie server running Apache 2.4 (this is the default version in Ubuntu 16.04 and Debian Stretch)
- An installation of Magento 2.
Please note, installing and configuring Varnish will take your store offline for a short period.
Step 1 - Install Varnish
Varnish is available from the standard repositories so can be installed with the following commands:
apt-get update
apt-get install varnish
Step 2 - Configure Varnish
Varnish intercepts the incoming web request by listening on port 80 instead of Apache. Once it has responded to any requests it can fulfill it passes on everything else to Apache on a different port. We, therefore, need to configure Varnish to listen on port 80 instead of Apache.
This is done by editing the systemd service file at /lib/systemd/system/varnish.service. We will use nano in the example but you can use any command line text editor that you prefer:
nano /lib/systemd/system/varnish.service
Locate the following line:
ExecStart=/usr/sbin/varnishd -j unix,user=vcache -F -a :6081 -T localhost:6082 -f /etc/varnish/default.vcl -S /etc/varnish/secret -s malloc,256m
And change it to read as follows:
ExecStart=/usr/sbin/varnishd -j unix,user=vcache -F -a :80 -T localhost:6082 -f /etc/varnish/magento.vcl -S /etc/varnish/secret -s malloc,256m
The amount of RAM that is allocated to Magento is also set here. The default is 256MB but can be set to anything else by editing the malloc,256m setting.
Whenever a systemd unit file is edited systemd must be updated with the following command:
systemctl daemon-reload
The final configuration file located at /etc/varnish/magento.vcl must be generated from within Magento. This file is generated by logging into your Magento dashboard and browsing as follows:
Dashboard -> Stores -> Advanced -> System
When there expand the Full Page Cache section. Uncheck the Use system value box and select Varnish Cache (Recommended) from the drop down list as shown here:
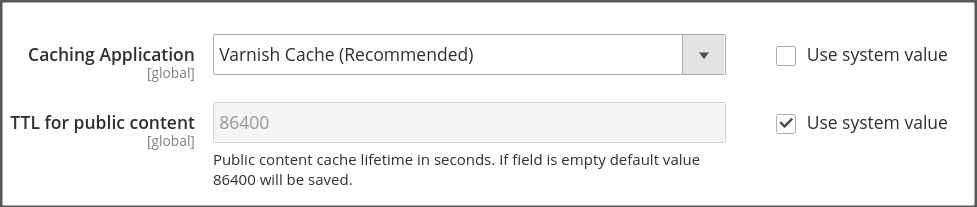
You must hit the Save config button at the top of the page here.
Next, expand the Varnish configuration section. It should be pre-filled as shown here:
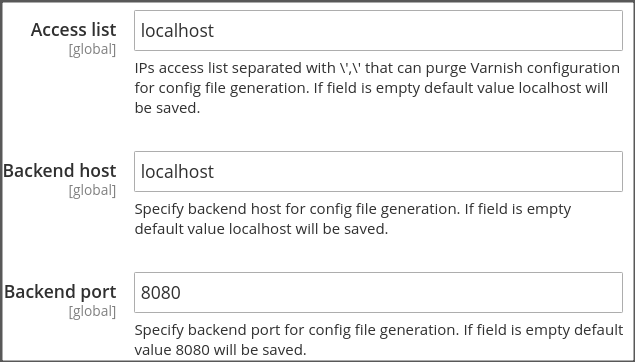
If it isn’t, copy the details shown above.
Next, hit the  button to download a pre-configured configuration file called varnish.vlc.
varnish.vlc is a text file so open it with a text editor on your local computer. Then, back on the server, paste the contents into a new file at /etc/varnish/magento.vcl e.g.:
nano /etc/varnish/magento.vcl
Save the file and exit. Apache must now be configured to stop listening on port 80 and instead listen on the Varnish backend port.
Step 3 - Configuring Apache
Apache now must to be configured to accept incoming web requests from Varnish rather than the internet. Before we edit the configuration we should stop Apache with the following command:
systemctl stop apache2.service
At this point your website will go offline.
Now move to Apache’s configuration directory and open ports.conf:
cd /etc/apache2/
nano ports.conf
You must edit the line that reads:
Listen 80
To:
Listen 8080
Save and close the file.
Now you must open the VirtualHost file for your website. You will find this under /etc/apache2/sites-enabled/. The first line will likely look like:
<VirtualHost *:80>
Edit this to read:
<VirtualHost 127.0.0.1:8080>
Now run a configuration check to ensure all your edits are correct with the following command:
apachectl configtest
Step 4 - Starting Apache and Varnish
Start Apache with the following command:
systemctl start apache2.service
Apache is now listening on port 8080. This can be checked by running:
netstat -plunt
Which will show this line:
tcp6 0 0 :::8080 ::* LISTEN 6682/apache
if Apache is correctly configured to listen on port 8080.
Varnish is started with the following command:
systemctl start varnish.service
This can be checked with the same command that we used for Apache:
netstat -plunt
Which should show this line:
tcp 0 0 0.0.0.0:80 0.0.0.0:* LISTEN 6743/varnishd
Varnish and Apache should now be working together but this must be checked before we can consider the job as finished.
Step 5 - Checking Apache and Varnish
We will need to check both Apache and Varnish at the same time so open two terminals to your server. In the first, use the tail command to follow the Apache log for your site e.g.:
tail -f /var/log/apache2/access.log
In the second we will monitor the Vanish log. Varnish does not write to a log file as this as this slows down its performance. Instead, it runs a logging process that can be monitored with the following command:
varnishlog
Finally, click around your website. You should see both of the logs getting new lines written to them, and in the case of VArnishlog you will see a great deal of information.
Conclusion
Varnish is now working to speed up your website and also reduce the memory and CPU requirements of Apache. The performance of Varnish will improve over a short time as more static website objects are loaded and stored in the cache.