Varnish is an in-memory caching proxy server that caches website objects such as images, html pages, CSS files in RAM. Varnish works by accepting the web requests before Apache and serving an object very rapidly if it has it in its cache. If Varnish does not have the object then it will pass on the request to Apache.
This post is Part 4 of the Magento benchmarking series of posts. The server I am benchmarking here is the standard server used in Part 1 with PHP-FPM installed and configured from Part 2. You can see those posts here along with the Reddis cached server in Part 3:
The Varnish cache will replace the Reddis cache as they cannot be both run at the same time on the same server with Magento.
Installing Varnish
Varnish is available in the default Debian repositories so a simple apt install will get it on your server:
apt update
apt upgrade
apt install varnish
The default configuration for Varnish is as follows:
- Listen Interface: all
- Listen Port: 6081
- Cache Size: 256MB
The interface needs to be changed to make Varnish only listen on localhost (127.0.0.1). Also, the cache size is quite large given that our system only has 1GB so this is reduced to 128MB.
We are going to modify the systemd startup configuration for Varnish by creating a systemd override file rather than editing the service file directly. This allows us to modify the startup behavior in a way that will be preserved across updates to the service file.
First, create the directory that will contain the override file:
mkdir /etc/systemd/system/varnish.service.d/
Next, we need to identify the line that we need to change in the service file. The easiest way to do this is to use the systemctl cat <APPLICATION>.service command:
systemctl cat varnish.service
# /lib/systemd/system/varnish.service
[Unit]
Description=Varnish HTTP accelerator
Documentation=https://www.varnish-cache.org/docs/6.1/ man:varnishd

[Service]
Type=simple
LimitNOFILE=131072
LimitMEMLOCK=82000
ExecStart=/usr/sbin/varnishd -j unix,user=vcache -F -a :6081 -T localhost:6082 -f /etc/varnish/default.vcl -S /etc/varnish/secret -s malloc,256m
ExecReload=/usr/share/varnish/varnishreload
ProtectSystem=full
ProtectHome=true
PrivateTmp=true
PrivateDevices=true

[Install]
WantedBy=multi-user.target
The only line we need to change is the line beginning ExecStart as it sets the cache size with the -s malloc,256m directive and the interface with -a localhost:6081. Open a new file at /etc/systemd/system/varnish.service.d/override.conf with the following contents:
[Service]
ExecStart=
ExecStart=/usr/sbin/varnishd -j unix,user=vcache -F -a localhost:6081 -T localhost:6082 -f /etc/varnish/default.vcl -S /etc/varnish/secret -s malloc,128m
Note, the first, empty ExecStart= is necessary so that the line from the original service file is removed and the new one applied.
Systemd will now substitute the modified ExecStart line in the override.conf file for the line in the service file but preserve all the other lines.
The following command will instruct systemd to load the new configuration:
systemctl daemon-reload
Restart Varnish to pick up its new configuration:
systemctl restart varnish.service
Use the same process to modify the interface and/or the port if you need to do that.
Configuring Apache2
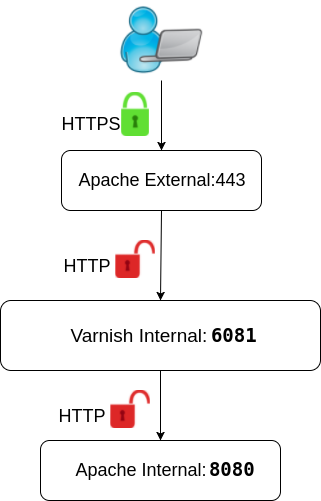
We cannot set Varnish to listen for the incoming HTTPS connections because it does not have the ability to terminal HTTPS connections. Instead, we will use an additional virtual host file for Apache2 to accept the inbound HTTPS connection then pass the connections off to Varnish listening on a private IP/port which in turn will pass them to another Apache2 VirtualHost also listening on an internal IP/port which will finally serve the Magento site content.
This setup is probably best demonstrated with a diagram:
The process to get this working will be:
- Modify the existing VirtualHost to terminate the HTTPS requests and pass them on to Varnish.
- Configure Varnish to accept the HTTP requests and hand off any it can’t fulfill to the internal Apache process.
We will also need to enable a couple of additional Apache modules to get the proxy redirection working. The first is the xforward mod:
apt install libapache2-mod-xforward
Then, enable the headers module:
a2enmod headers
And restart Apache:
systemctl restart apache2.service
Modify Magento’s existing VirtualHost file
I am going to use a standard HTTPS VirtualHost file that was generated by Let’s Encrypt. Here it is in full:
<IfModule mod_ssl.c>
<VirtualHost *:443>

        ServerName <MAGENTO HOSTNAME>
        DocumentRoot <MAGENTO DOCUMENTROOT>
        ErrorLog ${APACHE_LOG_DIR}/magento_error.log
        CustomLog ${APACHE_LOG_DIR}/magento_access.log combined

        <Directory <MAGENTO DOCUMENTROOT> >
                Options FollowSymLinks
                AllowOverride All
        </Directory>

        SSLCertificateFile /etc/letsencrypt/live/<MAGENTO HOSTNAME>/fullchain.pem
        SSLCertificateKeyFile /etc/letsencrypt/live/<MAGENTO HOSTNAME>/privkey.pem
        Include /etc/letsencrypt/options-ssl-apache.conf

</VirtualHost>
</IfModule>
We will need to remove the <Directory> section and the <DocumentRoot line as this will get moved to the new VirtualHost that we are going to create that will actually serve the site.
In their place we need to add some lines to instruct Apache to pass on the requests i.e. proxy them, to another server i.e. Varnish. Varnish is listening on localhost:6081 (or 127.0.0.1:6081) so the new VirtualHost looks like this:
<IfModule mod_ssl.c>
<VirtualHost *:443>

        ServerName <MAGENTO HOSTNAME>
        ErrorLog ${APACHE_LOG_DIR}/magento_external_HTTPS_error.log
        CustomLog ${APACHE_LOG_DIR}/magento_external_HTTPS_access.log combined

        ProxyPreserveHost   On
        ProxyPass           / http://127.0.0.1:6081/
        ProxyPassReverse    / http://127.0.0.1:6081/
        RequestHeader       set X-Forwarded-Proto expr=%{REQUEST_SCHEME}

        SSLCertificateFile /etc/letsencrypt/live/<MAGENTO HOSTNAME>/fullchain.pem
        SSLCertificateKeyFile /etc/letsencrypt/live/<MAGENTO HOSTNAME>/privkey.pem
        Include /etc/letsencrypt/options-ssl-apache.conf

</VirtualHost>
</IfModule>
Apache is now accepting and terminating the HTTPS sessions and passing them on the Varnish. We now need to create the second Apache VirtualHost on the “other side” of Varnish that will serve the site by fulfilling non-cached requests.
Configure a new internal VirtualHost
This VirtualHost file will instruct Apache to listen on localhost:8080 for HTTP requests for the Magento site. These requests will arrive from Varnish for any non-cached content.
The VirtualHost file need the following contents:
<VirtualHost 127.0.0.1:8080>

        ServerName <MAGENTO HOSTNAME>
        DocumentRoot <MAGENTO DOCUMENTROOT>

        ErrorLog ${APACHE_LOG_DIR}/magento_internal_HTTP_error.log
        CustomLog ${APACHE_LOG_DIR}/magento_internal_HTTP_access.log combined

        SetEnvIf X-Forwarded-Proto https HTTPS=on
        RemoteIPHeader X-Forwarded-For

        <Directory <MAGENTO DOCUMENTROOT> >
                Options FollowSymLinks
                AllowOverride All
        </Directory>

</VirtualHost>
Apache will not listen on 127.0.0.1:8080 unless it is specified in the /etc/apache2/ports.conf file. Open this file add the following line:
Listen 127.0.0.1:8080
Enable the new VirtualHost and restart Apache to load all the new configuration.
Your Magento site should be online and working now without any errors.
Magento and Varnish need some additional tuning configuration to complete the work.
Configure Magento
Magento needs to be configured to know about the Varnish cache. It will also generate some highly optimized Varnish configuration that we will configure Varnish to use in the next section.
Log into the Admin pages for Magento and browse to:
Magento -> Stores -> Configuration -> Advanced -> System
Expand the Full Page Cache section. Un check the box marked Use System Value on the Caching Application line. The drop-down list will become available. Select Varnish Cache (Recommended).
Next expand the Varnish Configuration section immediately below. We need to generate the VLC configuration that is appropriate for the version of Varnish installed on the server. In the case of Debian 10 Buster this is Varnish 6.
Clicking this button will prompt a file download. This is a text file that contains Varnish configuration. Save and open this file with a text editor for the next section.
Finally, hit Save Config to retain the configuration.
Configure Varnish
Back on the server’s command line move to the central Varnish configuration directory at /etc/varnish.
Rename the existing Varnish configuration file:
mv default.vcl default.vcl.original
Next, open a new configuration file:
nano default.vlc
and copy and past the contents of the file you downloaded from the Magento admin panel. Then reload Varnish:
systemctl restart varnish.service
Your Magento instance should now be getting served via the Magento cache.
Benchmarks Results
The following tables shows the results of adding a Redis cache to the basic server also running PHP-FPM:
| HTTP | HTTPS | |
|---|---|---|
| Stock server | 147 trans/sec | 111 trans/sec |
| PHP-FPM | 165 trans/sec (12%) | 116 trans/sec (5%) |
| Redis & PHP-FPM | 187 trans/sec (27%) | 142 trans/sec (28%) |
| Varnish PHP-FPM | 1616 trans/sec (999%) | 299 trans/sec (168%) |
I wasn’t sure that the HTTP result was correct so I had to check in a browser that would allow me to use both HTTP and HTTPS (this is diabled in Firefox and Chrome) and the Magento instance was indeed being served at that speed. However, this isn’t really much use as only HTTPS sites are acceptable these days.
The final post in this series will be observing the effect of increasing the size of the VM to include more memory and more CPU cores.