These days it is becoming mandatory to serve websites only via HTTPS. This is great for security but makes deploying a Varnsh caching server more difficult.
This is because, Varnish does not, and has no plans to, support HTTPS. As a result, Varnish cannot simply be configured to listen on the external IP on port 443 for incoming HTTPS connections as it does for HTTP connections.
An intermediary program is therefore required to accept the HTTPS connections, decrypt them, and then hand them off as HTTP requests to Varnish and then re-encrypt them on the way out. This program is called an SSL terminator.
Common recommendations for the SSL termination programs are nginx or Pound which are installed alongside the primary web server serving the site.
However, installing an additional program to terminate the SSL connections is redundant because Apache can already do this. There is no need to install, configure and learn a new program when you already know Apache.
In this guide, we will examine using Apache2 as both the SSL terminator and content server with Varnish as the caching server.
Furthermore, we will explore two website configurations:
- HTTP and HTTPS.
- HTTPS only.
The first configuration will serve your site from HTTP and HTTPS . The second will only serve your site from HTTPS.
This guide has been tested to work on Ubuntu 18.04 and Debian Jessie. However, the configuration and structure will work on any distributions that support Varnish and Apache2.
Common Operations
Before we can start configuring Apache and Varnish for either setup, they need installing and some Apache modules enabling.
Firstly, install Apache and Varnish:
apt-get update
apt-get upgrade
apt-get install varnish apache2
Next, load all the necessary Apache modules:
a2enmod ssl
a2enmod proxy
a2enmod proxy_balancer
a2enmod proxy_http
And restart:
systemctl restart apache2.service
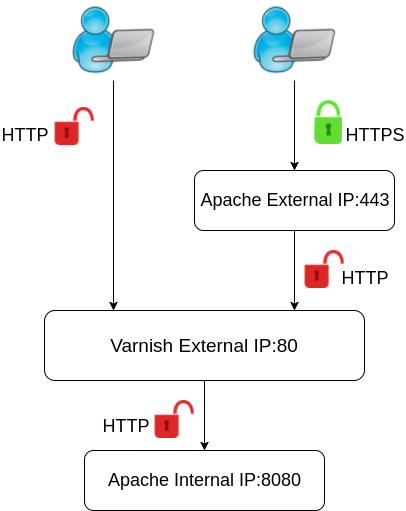
HTTPS and HTTP
This configuration will have one Apache VirtualHost listening on the external IP for HTTPS connections and another VirtualHost listening on localhost for the content requests from Varnish.
In addition, Varnish will accept the HTTP requests on the external and internal IP’s and so take care of the HTTP side of things.
The structure will be easier to understand with the following diagram:
We will first configure Apache to listen for both external HTTPS requests and internal HTTP requests by creating two VirtualHost files.
The first file we will create will accept the external HTTPS connections and then hand off the requests to Varnish. We will call this VirtualHost file external-https.conf and it looks like:
<VirtualHost *:443>
        ServerName            example.com
        ErrorLog              /var/log/apache2/external-https_error.log
        CustomLog             /var/log/apache2/external-https_access.log combined

        SSLCertificateFile    /etc/ssl/example.com.crt
        SSLCertificateKeyFile /etc/ssl/example.com.key

        ProxyPreserveHost       On
        ProxyPass               / http://127.0.0.1:80/
        ProxyPassReverse        / http://127.0.0.1:80/
</VirtualHost>
The first part of the VirtualHost file is absolutely normal except there is no DocumentRoot listed. This is because of the second block which sets the Proxy directives. These directives instruct Apache to direct incoming page requests to 127.0.0.1:8080 (Varnish) and also accept the responses back from the same location rather than serve the content directly.
The next VirtualHost file will be the one that configures Apache accept HTTP requests from and to serve the site content back to Varnish. This file we will call internal-http.conf and looks like:
<VirtualHost 127.0.0.1:8080>
        ServerName    example.com
        DocumentRoot  /var/www/html
        ErrorLog      /var/log/apache2/internal-http_error.log
        CustomLog     /var/log/apache2/internal-http_access.log combined
</VirtualHost>
The final Apache configuration is to stop Apache listening on port 80 and enable port 8080. This is done by editing /etc/apache2/ports.conf. Edit the following line:
Listen 80
Becomes:
# Listen 80
Listen 127.0.0.1:8080
Finally, the two new VirtualHost files need enabling. This is done using the a2ensite command with the name of the VirtualHost file without the .conf. The command to enable the two files listed above looks like:
a2ensite external-https
a2ensite internal-http
That completes the Apache configuration. We now need to configure Varnish.
The first file that needs to be edited is the systemd unit file as this file sets the port that Varnish will listen on. The file can be found at /lib/systemd/system/varnish.service. You need to edit the following line:
ExecStart=/usr/sbin/varnishd -a :6081 -T localhost:6082 -f /etc/varnish/default.vcl -S /etc/varnish/secret -s malloc,256m
And change the -a :6081 to -a :80:
ExecStart=/usr/sbin/varnishd -j unix,user=vcache -F -a :80 -T localhost:6082 -f /etc/varnish/default.vcl -S /etc/varnish/secret -s malloc,256m
Note, the final part malloc,256m sets the maximum amount of memory that Varnish can use. If you are on a small server you should lower this amount.
When you have made this change systemd needs updating with the following command:
systemctl daemon-reload
The Varnish default is to direct content requests to 127.0.0.1:8080 which we have already configured Apache to listen on so no additional configuration of Varnish is necessary.
Apache and Varnish are (re)started with the following commands:
systemctl restart apache2
systemctl restart varnish
Everything should now be working. The final section of this guide covers testing the setup to check that everything is working correctly.
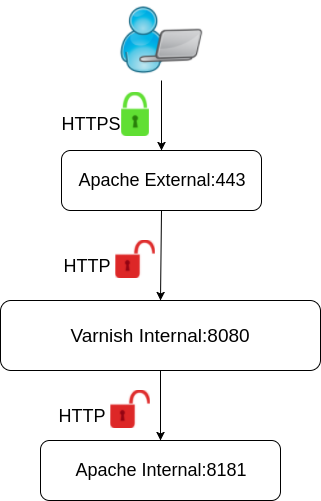
HTTPS only
In this section, we will configure the server so that only Apache is configured to listen for HTTPS connections on the external IP address on port 443. Varnish will not be configured to listen on any public IP addresses.
This is the diagram for this configuration:
We will need to create the following two VirtualHost files for this configuration.
The VirtualHost file that will accept the HTTPS connections on the public IP address, which will again be called external-https, looks like the following:
<VirtualHost *:443>
        ServerName example.com
        ErrorLog              /var/log/apache2/external-https_error.log
        CustomLog             /var/log/apache2/external-https_access.log combined

        SSLCertificateFile    /etc/ssl/example.com.crt
        SSLCertificateKeyFile /etc/ssl/example.com.key

        ProxyPreserveHost       On
        ProxyPass               / http://127.0.0.1:8080/
        ProxyPassReverse        / http://127.0.0.1:8080/
</VirtualHost>
The first part of the VirtualHost file is absolutely normal except there is no DocumentRoot listed. This is because of the second block which sets the Proxy directives. These directives instruct Apache to direct incoming page requests to 127.0.0.1:8080 and also accept the responses back from the same location rather than serve the content directly.
The second VirtualHost file, called internal-http.conf, will be the one that Varnish serves content to Varnish. This VirtualHost will be configured to listen on 127.0.0.1:8181. This VirtualHost file should look like the following:
<VirtualHost 127.0.0.1:8181>
        ServerName    example.com
        DocumentRoot  /var/www/example
        ErrorLog      /var/log/apache2/internal-http_error.log
        CustomLog     /var/log/apache2/internal-http_access.log combined
</VirtualHost>
The last piece of Apache configuration is the /etc/apache2/ports.conf file. We will edit this so that the internal VirtualHost file is able to listen on localhost on port 8181. All that you need to do is to add the line to /etc/apache2/ports.conf:
Listen 127.0.0.1:8181
These two new Virtual host files need enabling with the a2ensite command. I labeled my configuration files external-https.conf and internal-http.conf so these commands are:
a2ensite external-https
a2ensite internal-http
Apache is now fully configured. Next up we need to configure Varnish.
The first configuration file we need to edit is the one that sets what port and IP Varnish is listening on for HTTP requests. This file is the systemd unit file that is located at /lib/systemd/system/varnish.service. Open this file with your favourite text editor and change the following line:
ExecStart=/usr/sbin/varnishd -j unix,user=vcache -F -a :6081 -T localhost:6082 -f /etc/varnish/default.vcl -S /etc/varnish/secret -s malloc,256m
to:
ExecStart=/usr/sbin/varnishd -j unix,user=vcache -F -a 127.0.0.1:8080 -T localhost:6082 -f /etc/varnish/default.vcl -S /etc/varnish/secret -s malloc,256m
The change that we made was to edit the IP/port that Varnish is listening on from -a :6081 to -a 127.0.0.1:8080.
Note, the amount of system memory allocated to Varnish is also set here with the malloc,256m option at the end of the line. Change this to suit the needs of your system.
When you have made this change systemd needs updating with the following command:
systemctl daemon-reload
The final configuration edit is it change where Varnish will hand off any requests that it can’t fulfill. This is made in the /etc/varnish/default.vcl file. Open this file in a text editor and make the following change:
# Default backend definition. Set this to point to your content server.
backend default {
    .host = "127.0.0.1";
    .port = "8080";
}
To:
# Default backend definition. Set this to point to your content server.
backend default {
    .host = "127.0.0.1";
    .port = "8181";
}
Now, restart Apache and Varnish:
systemctl restart apache2.service
systemctl restart varnish.service
Everything should now be working. The following section will cover testing and troubleshooting your new setup.
Testing and troubleshooting
Firstly, open several new terminals to the server. We will use these to monitor the log files for Varnish and Apache and run commands.
In the first terminal run the ‘varnishlog’ command to print Varnish logging information to the terminal:
varnishlog
Nothing will get printed until Varnish processes a request.
In another terminal change to Apache’s log directory and tail both the internal and external VirtualHost’s access logs:
cd /var/log/apache2
tail -f external-https_access.log -f internal-http_access.log
Now we need to make some requests by HTTP and HTTPS. A browser is not the best tool for this job as they tend to prefer HTTPS and will often make an HTTPS request even when you enter HTTP URL. They will also try to cache content and generally try to be smart about things which is not what we need here.
Instead, we are going to use curl which will only do exactly what we tell it. Curl has the added advantage of printing out additional, useful information when the -v flag is used.
Firstly, we will test out the HTTP and HTTPS configured server by making an HTTP request. From another terminal use the following command to request the HTTP version of the site:
curl -v http://example.com
If everything is working then curl will print out the following:
*   Trying 203.0.113.0...
* Connected to example.com (203.0.113.0) port 80 (#0)
> GET / HTTP/1.1
> Host: example.com
> User-Agent: curl/7.47.0
> Accept: */*
>
< HTTP/1.1 200 OK
< Date: Mon, 16 Oct 2017 08:31:18 GMT
< Server: Apache/2.4.18
< Last-Modified: Mon, 16 Oct 2017 04:20:36 GMT
< Vary: Accept-Encoding
< Content-Type: text/html
< X-Varnish: 33016 16
< Age: 39
< Via: 1.1 varnish-v4
< ETag: "W/50-55ba254095ca6-gzip"
< Accept-Ranges: bytes
< Content-Length: 80
< Connection: keep-alive
<
<html>
Test page for using Apache as SSL termination.
</html>
* Connection #0 to host example.com left intact
If you look back at the diagram of the dual-protocol setup, Varnish handles the external HTTP request, and the Apache internal VirtualHost serves uncached content back to Varnish.
This means that if everything is working correctly you will see the connection logged to the Varnish log and the internal-http_access.log file. But not the external-https_access.log file.
Next, try the same curl command but this time use an https URL:
curl -v https://example.com
This will output more information than the HTTP request:
*   Trying 203.0.113.0...
* Connected to example.com (203.0.113.0) port 443 (#0)
* found 148 certificates in /etc/ssl/certs/ca-certificates.crt
* found 594 certificates in /etc/ssl/certs
* ALPN, offering http/1.1
* SSL connection using TLS1.2 / ECDHE_RSA_AES_128_GCM_SHA256
*        server certificate verification OK
*        server certificate status verification SKIPPED
*        common name: example.com (matched)
*        server certificate expiration date OK
*        server certificate activation date OK
*        certificate public key: RSA
*        certificate version: #3
*        subject: CN=example.com
*        start date: Mon, 16 Oct 2017 03:28:43 GMT
*        expire date: Sun, 14 Jan 2018 03:28:43 GMT
*        issuer: C=US,O=Lets Encrypt,CN=Lets Encrypt Authority X3
*        compression: NULL
* ALPN, server accepted to use http/1.1
> GET / HTTP/1.1
> Host: example.com
> User-Agent: curl/7.47.0
> Accept: */*
>
< HTTP/1.1 200 OK
< Date: Mon, 16 Oct 2017 08:52:33 GMT
< Server: Apache/2.4.18
< Last-Modified: Mon, 16 Oct 2017 04:20:36 GMT
< Vary: Accept-Encoding
< Content-Type: text/html
< X-Varnish: 27
< Age: 0
< Via: 1.1 varnish-v4
< ETag: W/"50-55ba254095ca6-gzip"
< Accept-Ranges: bytes
< Content-Length: 80
<
<html>
Test page for using Apache as SSL termination.
</html>
* Connection #0 to host example.com left intact
This time, for both setups, you should see the Varnishlog and the Apache internal and external log files written to.
If you are seeing any error messages, you also have individual Apache error log files for the internal and external VirtualHost’s so you will easily be able to see where the problem occurred.
Finally, try visiting the site in your browser, using both HTTPS and HTTP and monitoring all the log files to ensure that everything is working correctly.
ERR_TOO_MANY_REDIRECTS Error
If you see an error that says:
This page isn't working

example.com redirected too many times.

Try clearing your cookies.

ERR_TOO_MANY_REDIRECTS
The error page looks like the following:
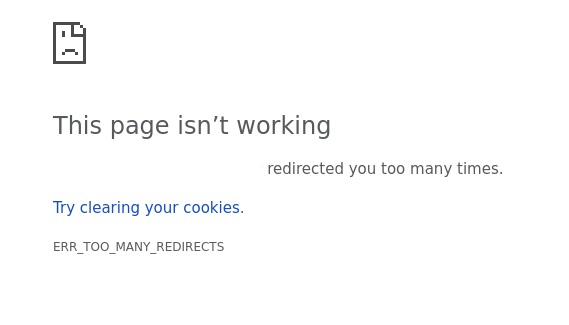
This is caused by header information not being correct forwarded along with the requests. This error will commonly occur with Magento, WordPress, Drupal, Joomla and other CMS’s that are used behind this setup.
It can be easily fixed by firstly loading the ‘mod_headers’ Apache module with the following command:
a2enmod headers
systemctl restart apache2
Next, a couple of additional lines need adding to the external and internal VirtualHost files. Open external-https.conf and add the following line:
RequestHeader set X-Forwarded-Proto expr=%{REQUEST_SCHEME}
This gives us a complete file that looks like:
<VirtualHost *:443>
        ServerName            example.com
        ErrorLog              /var/log/apache2/external-https_error.log
        CustomLog             /var/log/apache2/external-https_access.log combined

        SSLCertificateFile    /etc/ssl/example.com.crt
        SSLCertificateKeyFile /etc/ssl/example.com.key

        RequestHeader set X-Forwarded-Proto expr=%{REQUEST_SCHEME}

        ProxyPreserveHost       On
        ProxyPass               / http://127.0.0.1:80/
        ProxyPassReverse        / http://127.0.0.1:80/
</VirtualHost>
Next, open internal-http.conf and add the following line:
SetEnvIf X-Forwarded-Proto https HTTPS=on
The entire files therefore looksl like:
<VirtualHost 127.0.0.1:8080>
        ServerName    example.com
        DocumentRoot  /var/www/html
        ErrorLog      /var/log/apache2/internal-http_error.log
        CustomLog     /var/log/apache2/internal-http_access.log combined
        SetEnvIf X-Forwarded-Proto https HTTPS=on
</VirtualHost>
Finally, restart Apache2:
systemctl restart apache2
And reload the page. This fix will work if you encounter the error with either of the configurations shown on this page.